
Background information
The NinjaOne agent gives you the ability to customise your system tray and add things like about text, email links, a help request form, a URL and other things. Unfortunately HaloPSA doesn't currently support hooking into NinjaOne's help request form (don't worry, we're talking to NinjaOne and Halo Service Solutions about this!) so we're left with a bit of a workaround as a solution.
Getting HaloPSA ready
For this to work we're relying on a feature which Halo released in version 2.73, now this might not be available to you considering 2.72 is the current stable. Still - let's see how we do this and then when you have 2.73 or greater you can configure this yourself.
You can use URI parameters in the self-service portal to set the default value of text custom fields on the new ticket screen
Add &customfield_{id} to the URL with {id} replaced with the id of the custom field.
https://myhalourl/portal/newticket?tickettype_id=1&customfield_174=text%20test would set custom field with ID 174 to "text test" by default.
Now that we know how it works - we'll need to add some custom fields to a ticket form in order to get this to work. First though, let's step back a second and check what information we can send from Ninja's agent...
What can NinjaOne provide to Halo?
We can find the information on what variables NinjaOne provides for use in the various system tray items in this NinjaDojo article. The available variables differ depending on what you're adding to the tray icon, we're interested in Placeholders for Menu Items. These are:
${IP_ADDR}- IP Address${USERNAME}- Username of current user${HOSTNAME}- Machine hostname${DOMAIN}- Domain that the machine has joined${TIMESTAMP}- Current timestamp in ISO format (UTC)- Any other environment variable - for example
${PROCESSOR_ARCHITECTURE}
That last one is pretty important, any environment variable - so what information might that include? Run Get-ChildItem ENV: in a PowerShell session to get a list of currently available environment variables. Useful environment variables include ${COMPUTERNAME} but it's also worth noting that you can set environment variables from your NinjaOne scripts - we often set environment variables that indicate the state of key components - e.g. OneDrive status.
Back to setting up HaloPSA
So back to HaloPSA, we're heading to Configuration -> Tickets -> Ticket Types selecting the ticket type we want our users to create from the NinjaOne tray, in our example we're going to use Incident - make sure you check the URL for the tickettypeid which for ours, in our example, is 1.
Click on Field List then click on Edit and finally Add, you'll be presented with a popup that lets you select existing Field Groups or add new ones using the Add button.
We're going to create a Field Group to hold our fields which will be coming from NinjaOne. So we're going to click on New on the Field Groups page, we're going to enter a name, in our case we're calling this NinjaOne and we're inputting a Group Header to mark these fields on the form as Device Information.
Save your field group then click on Field List and click Edit. We're going to add some fields using Add.
You'll see all custom fields available to you here to add to your group, many of the ones you want are probably already there, if not - go to Configuration -> Custom Objects -> Custom Fields and add new fields to the Ticket entity.
In our example we're adding a custom field called Computer Name
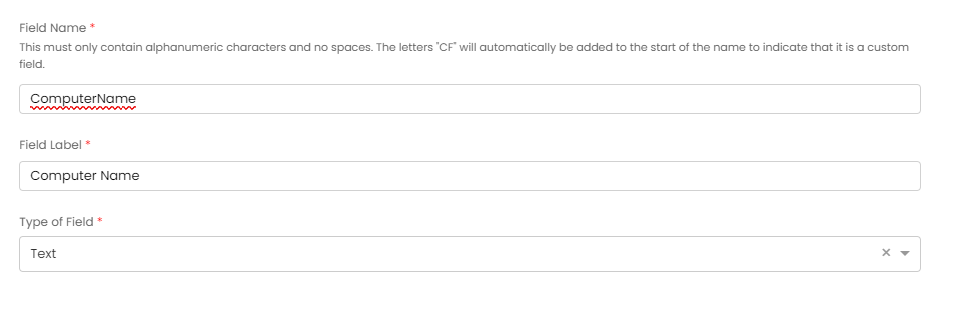
Make sure when you add a field that you grab the field id from the URL, in our case this was 170. Once we've added the field(s) it should look like this:
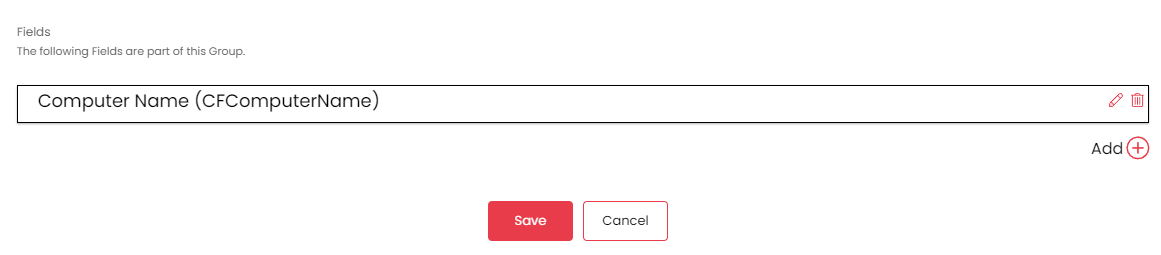
Let's pop onto the portal and check whether the field shows up, it does! Great! Now if we didn't get the ID previously we can right click the field, hit Inspect Element and grab the number from the end of the id attribute.
So, we know we want a link to create a ticket (of type id 1) which fills in custom field (with id 170) with the value of ${COMPUTERNAME} from NinjaOne. So let's string that together ready for NinjaOne...
https://yourhalo.portal.example/newticket?tickettype_id=1&customfield_170=${COMPUTERNAME}
That's it - that's our link, if we wanted to add more custom fields we just append them to the end &customfield_nnn=${variable}.
Adding the link to the SysTray icon
So we're going to head to Configuration -> Branding -> Systray Icon in NinjaOne and Add Menu Item, we want type URL, we're going to give it the label Open a Service Desk ticket..., we're going to pop our URL from earlier in and then hit Save.
That's it!